Color grading
How to White Balance in Final Cut Pro (Built-In Tools + a Faster Fix)
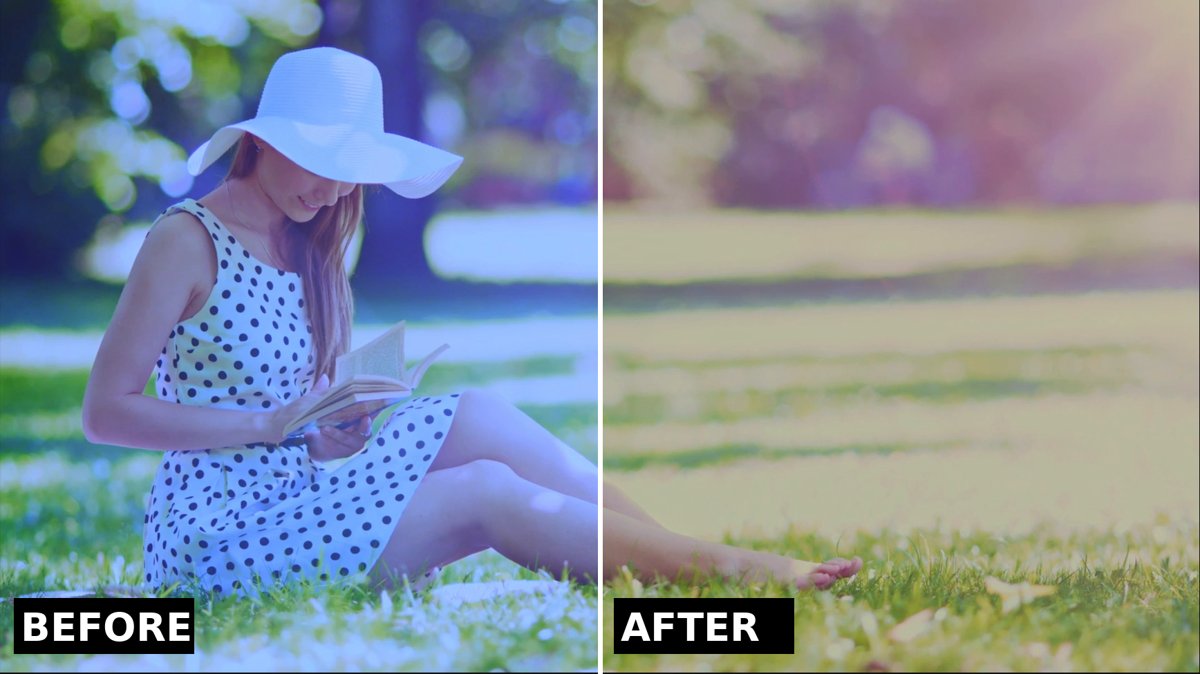
Quick answer: To white balance in Final Cut Pro, select your clip, choose Modify > Balance Color (Option-Command-B), then in the Video inspector set the Balance Color pop-up menu to White Balance and click something in the viewer that should be pure white. Final Cut Pro shifts the whole clip so that spot reads as white. Below are the built-in steps, the mistakes that trip people up, and a faster option with more control.

What white balance is (and how to tell when it's wrong)
White balance tells the camera what "white" looks like under the light you're shooting in. Daylight, tungsten bulbs, LEDs and window light all have different color temperatures. When the camera guesses wrong, everything picks up a color cast: blue or cool when daylight footage is set for indoor light, orange or warm when indoor footage is set for daylight, and sometimes green or magenta under certain fluorescent or LED lights.
The easiest check is to look at something you know is white or neutral gray: a shirt, a wall, a sheet of paper, a hat. If it looks tinted, your white balance is off. In the shot above, the white hat and dress clearly lean blue.
The built-in way: Balance Color and the White Balance eyedropper
Final Cut Pro has manual white balancing built in. These steps follow Apple's guide, Manually white-balance clips in Final Cut Pro for Mac:
- Select the clip in the timeline or browser, and put the playhead over it so it shows in the viewer.
- Turn on Balance Color: choose Modify > Balance Color or press Option-Command-B. (You can also use the Enhancements pop-up menu below the viewer.) This applies an automatic correction first.
- Open the Video inspector if it isn't showing (Command-4).
- In the Balance Color section, click the pop-up menu and choose White Balance. Your pointer turns into an eyedropper.
- In the viewer, click or drag over an area that should be pure white. Final Cut Pro adjusts the whole clip so those pixels become white.
For a lot of footage, that's all you need. It's free, it's fast, and it's a good first thing to try. Where it gets harder is when you want to fine-tune the result: the eyedropper gives you one correction, and further tweaks mean adding and adjusting separate color correction effects.
Common white balance mistakes
- Sampling a blown-out window or light. Apple specifically warns against sampling overexposed areas such as a light source or a shiny highlight. A bright window is already clipped to white, so it gives the eyedropper nothing useful to work with. Pick a properly exposed white instead, like a well-lit shirtsleeve or a white wall.
- Sampling something that isn't really white. Cream, beige, skin and warm wood will pull the whole shot the wrong way. If there's no true white, a neutral gray works better than a "nearly white" object.
- Expecting the automatic correction to match across clips. According to Apple, plain Balance Color creates a unique correction for each clip, so two shots from the same scene can end up looking different. A manual white balance you copy to other clips keeps them consistent (see Paste Attributes below).
- Mixed lighting. If a shot has window light on one side and warm bulbs on the other, one white point can't make everything neutral. Balance for your subject and accept some warmth or coolness elsewhere.
- Judging by eye on a tinted screen. Your eyes adjust to a color cast quickly. Compare against a known neutral, or look at the scopes, before you call it done.
The faster fix: the White Balance Plugin
If you want one effect that picks the white point and gives you the controls to finish the job, the White Balance Plugin does that in the Inspector. Here's the workflow:
- Add the effect. In the Effects browser sidebar, click My FCPeffects and drag White Balance Plugin 2 onto your clip.
- Pick the white. In the Inspector, click the color swatch next to White.Selector. The Colors window opens. Choose its eyedropper (lower left) and click an area of the shot that should be white.
- Set the exposure change. The plugin also adjusts exposure automatically. If that's too much, lower Auto.Exposure.Amount.
- Fine-tune. Use Blue-Orange and Green-Magenta for temperature and tint, plus brightness, contrast, shadows/midtones/highlights color balance, saturation, gamma, gain, blacks, fill and lift. Adjustment.Mix blends the correction with the original.
The White Balance Plugin is free when you join our email list.
It's one of 3 free plugins (Ken Burns, White Balance and Lens Flare). No checkout and no card: confirm your email and the download links arrive in your inbox.
Match all your clips with Paste Attributes
Once one clip looks right, copy that correction to the other clips from the same scene so they match. This works for the built-in white balance and for the plugin:
- Select the corrected clip and choose Edit > Copy (Command-C).
- Select the clips you want to match.
- Choose Edit > Paste Attributes (Shift-Command-V), tick the color correction or effect you want to copy, and click Paste.
With the plugin you can also click Save Effects Preset in the Inspector to reuse the same settings in future projects. For more on copying corrections, see Apple's white balance guide, which links to "Copy effects between clips".
White balance is usually the first step before a creative look. If you're new to color, our beginner's guide to color grading in Final Cut Pro covers what comes next.
FAQ
What is the shortcut for Balance Color in Final Cut Pro?
Option-Command-B turns on Balance Color (Modify > Balance Color). To white balance manually, then choose White Balance from the Balance Color pop-up menu in the Video inspector and click a white area in the viewer.
What should I click with the white balance eyedropper?
Something that should be white and is properly exposed, like a white shirt or wall in normal light. Avoid windows, lamps and shiny highlights, which are usually overexposed.
How do I make all my clips match after white balancing?
Copy the corrected clip, select the others, and use Edit > Paste Attributes (Shift-Command-V) to paste the correction. Apple notes that automatic Balance Color makes a different correction for each clip, so copying one manual correction is the way to keep shots consistent.
Is the White Balance Plugin really free?
Yes. It's one of three plugins (Ken Burns, White Balance and Lens Flare) you get free when you join our email list. There's no checkout and no payment details, and you can unsubscribe anytime and keep them.
Fix your white balance in seconds
The built-in eyedropper is a solid place to start. If you want white point picking, exposure, temperature and tint in one effect, grab the White Balance Plugin free.
Want everything? The MEGA BUNDLE includes all of our plugins (over 80) for $80, including White Balance.